How to Crochet a Gift Card Holder: An Easy Handmade Gift for Beginners

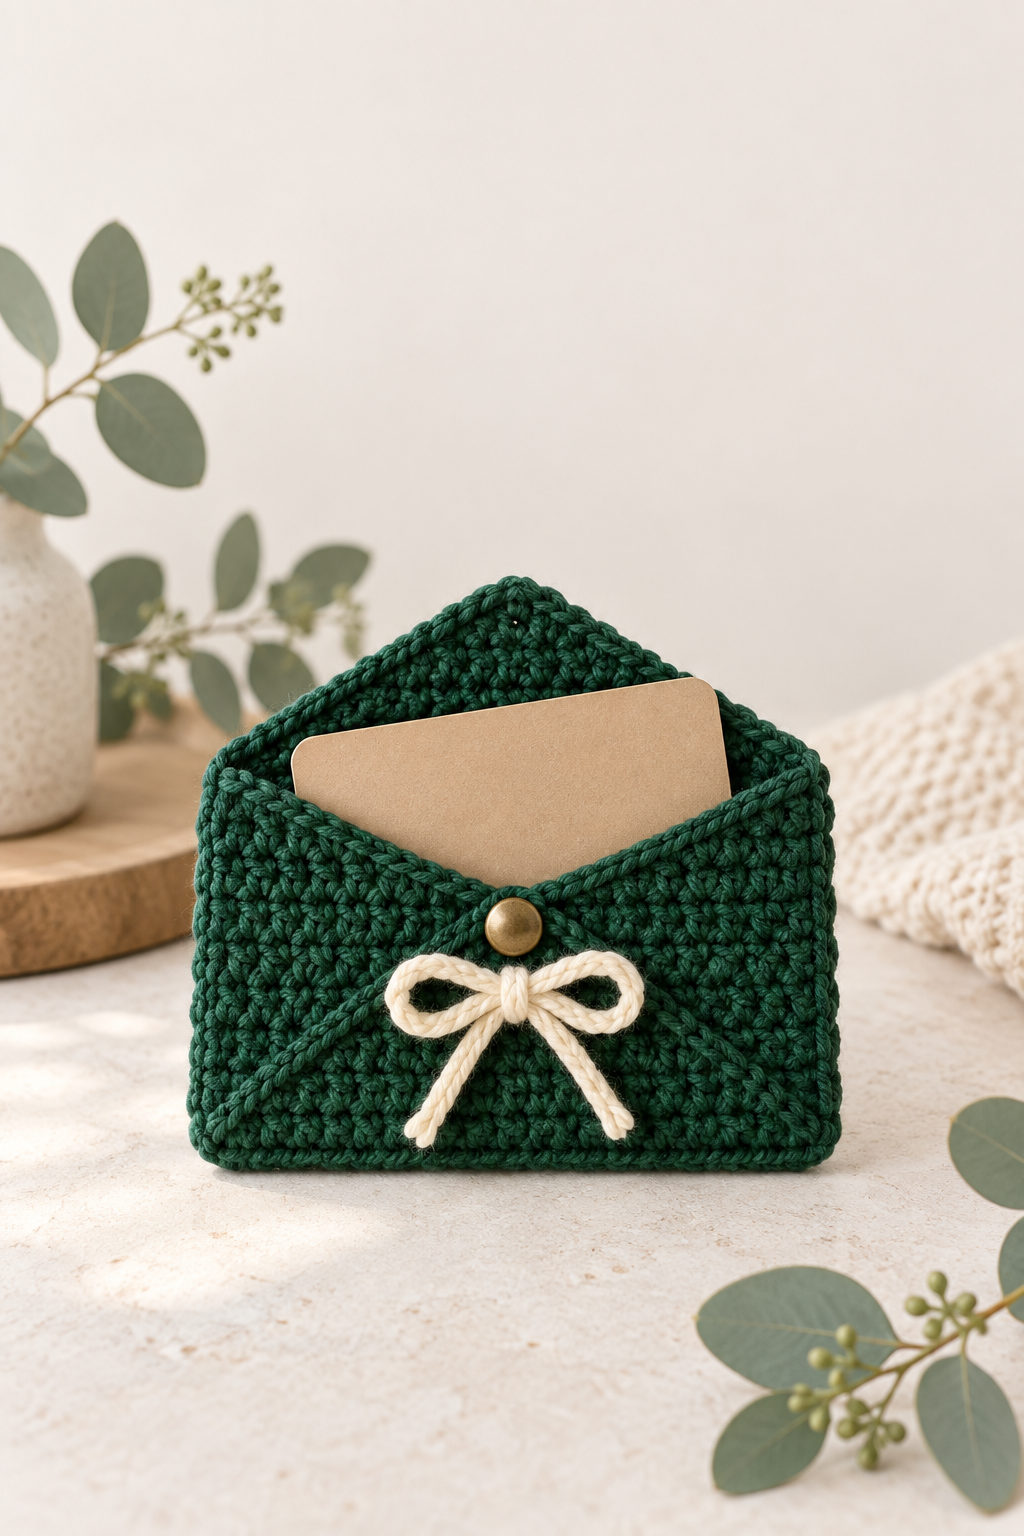
A handmade gift card feels more thoughtful when it arrives in something the recipient can keep. This beginner crochet gift card holder is a soft envelope-style sleeve made from one simple rectangle, folded into a pocket and finished with a small button loop. It is quick enough for a holiday gift basket, but useful year-round for birthdays, teacher thank-yous, graduations, or a coffee-date surprise. You will make a practical holder, not just a practice swatch: the finished pocket is sized to hold a standard card, and every construction choice has a job.
Quick facts
- Skill level: confident beginner
- Finished size: about 5½ in / 14 cm wide and 4 in / 10 cm tall when closed
- Construction: crochet one rectangle, fold the lower section, seam two sides, then add a loop closure
- Time: about 90 minutes to 2 hours, depending on pace
- Terminology: US crochet terms
What you need
- About 35–45 g worsted-weight cotton or smooth acrylic yarn
- A 4.5 mm crochet hook, or the hook that gives you a firm but flexible fabric
- Yarn needle and scissors
- One ½–¾ in / 12–18 mm button
- Two locking stitch markers, optional but very helpful
- A standard gift card, membership card, or a paper rectangle cut to the same size for fitting
Choose yarn that lets the stitch shape show. A fuzzy yarn can be lovely for a scarf, but it hides the top loops you need to count and makes a tiny seam harder to inspect. Cotton gives a crisp envelope; acrylic makes a softer, slightly stretchier version. If you are making several holders as small crochet gifts, use the same yarn family and change only the color so the size stays predictable.
Abbreviations and the project roadmap
ch = chain; hdc = half double crochet; sc = single crochet; sl st = slip stitch; st = stitch. We will begin with a chain, build a firm half-double-crochet rectangle, add a neat single-crochet border, fold the bottom into a pocket, seam the sides, and close the flap with a chain loop and button. Read the full roadmap once before starting. The rectangle is intentionally taller than the finished holder because the lower section becomes the pocket while the upper section becomes the flap.
Before you begin: make the fabric work for a card
Place your empty card on a table with the long edge horizontal. The holder must be wider than the card by at least ¾ in / 2 cm so it slides in without forcing the side seams. It also needs a pocket that covers roughly two thirds of the card’s height. Think of the rectangle as a sheet of paper: its width will stay the width of the envelope, while its height is divided between pocket and flap. If your yarn is much thicker than worsted, make a sample of six hdc stitches and measure it. Add or remove an even number of starting chains until your future rectangle is at least 5½ in / 14 cm wide.
Checkpoint: Do not begin the main rectangle until you can pull a chain through your hook without it being tight and hard. Tight foundation chains make the lower edge curl upward and can turn a simple folding step into a fight. If yours feels rigid, start again with a hook 0.5 mm larger for the chain only, then switch back to your project hook.
Step 1: Crochet the main rectangle
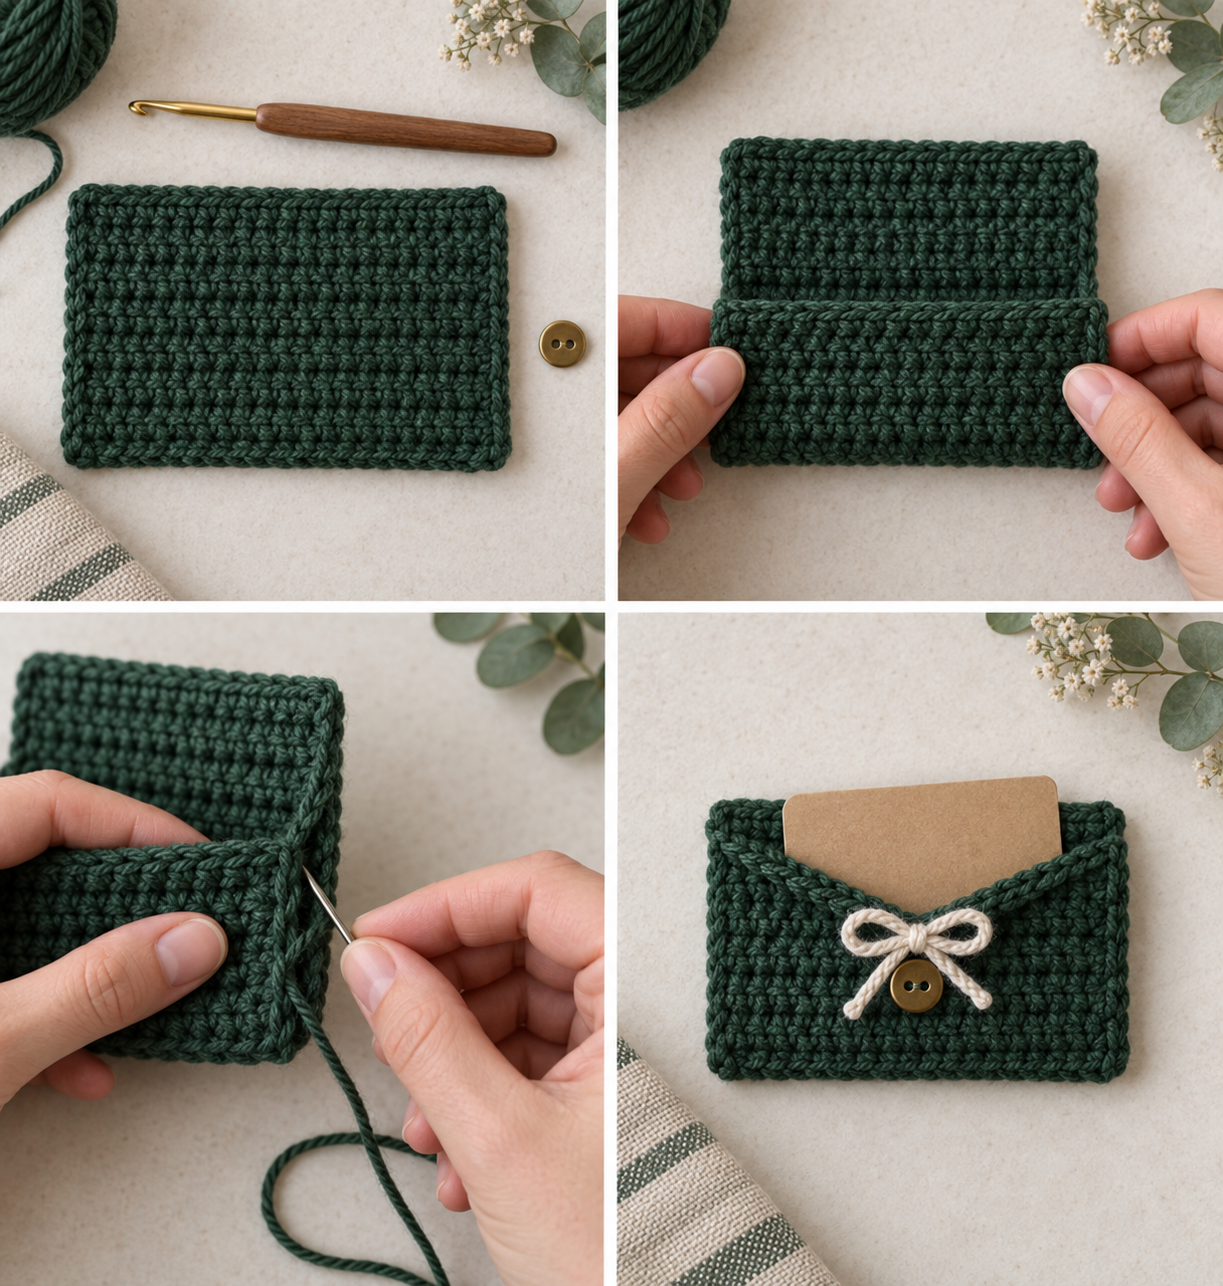
Ch 29. Starting in the third chain from the hook, work 1 hdc in each chain across. You should have 27 hdc stitches; the two skipped chains act as the turning height. Ch 2 and turn. For Rows 2–24, work 1 hdc in every stitch across, ch 2, and turn. The turning chain is not a stitch in this project, so do not work into it at the beginning or end of a row.
At the end of Row 24, lay the piece flat without stretching it. It should look like a calm, even rectangle, not a trapezoid. Count the top row: 27 hdc stitches should be visible. If you have 26, you probably missed the final stitch next to the turning chain; if you have 28, you probably worked into the turning chain. Undo only to the last correct row rather than trying to hide an extra stitch in a seam. A tiny project magnifies uneven edges.
Step 2: Add a tidy border and mark the fold
Do not fasten off. Ch 1, then work sc evenly around all four sides of the rectangle. Put 1 sc in each hdc across the top and bottom. On the long sides, work approximately 2 sc around each hdc row end; adjust by one stitch if needed so the edge lies flat. Put 3 sc in each corner. Join to the first sc with a sl st and fasten off, leaving a 12 in / 30 cm tail for the first side seam.
Now count nine hdc rows upward from the lower edge. Place one locking marker in each side border at that level. These markers are not decorative: they show exactly where the pocket’s top edge will land. If you accidentally count from the top, your flap may be too short to close. The pocket is the lower, marked section; the unmarked upper section is the flap.
Expected result: the border should frame the panel without rippling. A border that waves outward has too many stitches along the sides; a border that pulls inward has too few. You can fix this now by removing only the border and redistributing the side stitches. This is much easier than fixing a puckered envelope later.
Step 3: Fold and seam the pocket
Place the rectangle right side down. Fold the lower edge upward until it meets the two side markers. The right side of the fabric is now facing out on the pocket. Clip or pin the folded layers at each marker and at the lower corners. Slide your test card into the open top before sewing. It should enter easily and stop above the bottom edge. If it fits too tightly, do not pull the fabric wider; instead, reopen the fold and move it down by one row so the pocket gains a little room.
Thread the long tail onto your yarn needle. Starting at one lower corner, use whip stitch through both edge loops to join the pocket front to the back layer. Keep the stitches close together but not strangled; the seam should bend easily when you press it between your fingers. Stop at the marker, weave in the end for at least 2 in / 5 cm through the fabric, then repeat on the other side with a fresh yarn tail. Work from bottom to top on both sides so the seams match.
Mini scenario: if the card catches on a seam, look inside. A long diagonal yarn strand may be crossing the opening. Re-weave that tail horizontally through the top few stitches instead. The inside should be smooth enough that a paper card can slide in without snagging.
Step 4: Make the closure loop and attach the button
Fold the flap down over the pocket and find its center point. Join yarn at the center of the flap edge, ch 14 loosely, and sl st back into the same edge stitch to make a loop. Fasten off and weave in both ends. Test the loop around your button before sewing the button on: it should slip over the button with gentle pressure but should not fall off when you hold the holder upside down.
With the card inside, bring the flap forward and mark where the loop touches the pocket front. Sew the button there with sewing thread or matching yarn. Keep the button low enough that the flap lies flat, but high enough that the card stays covered. For a more gift-like finish, tie a short length of contrast yarn into a bow just below the button. The bow is optional; the sturdy pocket and closure are the functional parts.
Technique Lab: why this small construction is so useful
This project quietly teaches three skills that appear in larger crochet makes. First, the turning chain decision controls your edge count. Treating the ch-2 as a non-stitch makes the side straight because every working row contains the same 27 hdc stitches. Second, a border does more than decorate: it stabilizes row ends, gives your needle a clear place to enter, and hides slight tension differences. Third, folding a flat panel into a useful object is a construction method you can reuse for pouches, book sleeves, tablet cases, and small organizers.
Want a slightly firmer flap? On a future holder, replace the final two hdc rows with sc rows. Single crochet is shorter and denser, so the flap edge resists stretching. Want more drape? Use hdc for the border too, but know that it creates a rounder, less crisp envelope. Make one change at a time; that is how you learn what each crochet choice actually changes.
Troubleshooting your gift card holder
- The holder is too narrow: Your stitch gauge is tighter than expected. Make the next version with two to four more starting chains; do not stretch this one.
- The flap will not reach the button: Move the button lower, or add two chains to the loop. Changing the loop is safer than pulling the flap.
- The sides bow inward: Your whip stitches are too tight. Undo the seam and sew with the fabric resting flat, not held in the air.
- The card is visible above the pocket: Fold one extra hdc row upward before seaming, then check that enough flap remains for the closure.
- The corners curl: Steam-block gently if your yarn allows it, or press the holder under a book overnight with the card removed.
Frequently asked questions
Can I use single crochet instead of half double crochet?
Yes. Use the same width, but add rows until your rectangle is about 7 in / 18 cm tall before folding. Single crochet makes a denser, more structured holder and usually takes longer.
Can this hold cash too?
Yes, folded notes fit well. Place the cash behind the card or in front of it, then close the flap. Avoid adding bulky coins; this is a soft sleeve rather than a rigid wallet.
How can I personalize several holders quickly?
Use one neutral yarn for the main panel and change only the border, bow, or button color. You can also embroider a tiny initial on the flap before sewing the sides. Keep the base dimensions identical so every card still fits.
Your finished handmade gift
You have turned one rectangle into a useful, reusable crochet gift card holder and practiced counting, edging, folding, seaming, and a simple closure along the way. Before you gift it, open and close the flap three times and slide the card in and out once more; this tiny final test confirms the button, seams, and pocket are working together. Save this lesson for gift season, then return when you are ready to turn the same flat-panel idea into a matching pouch or book sleeve.
More in Crochet Projects & Patterns
How to Crochet a Gift Card Holder: An Easy Handmade Gift for Beginners
How to Crochet a Reusable Gift Bow: Easy Christmas Package Topper
How to Crochet a Flower Bookmark: An Easy Handmade Gift for Beginners