How to Crochet a Baby Sun Hat (3–6 Months) with a Sweet Ruffled Brim

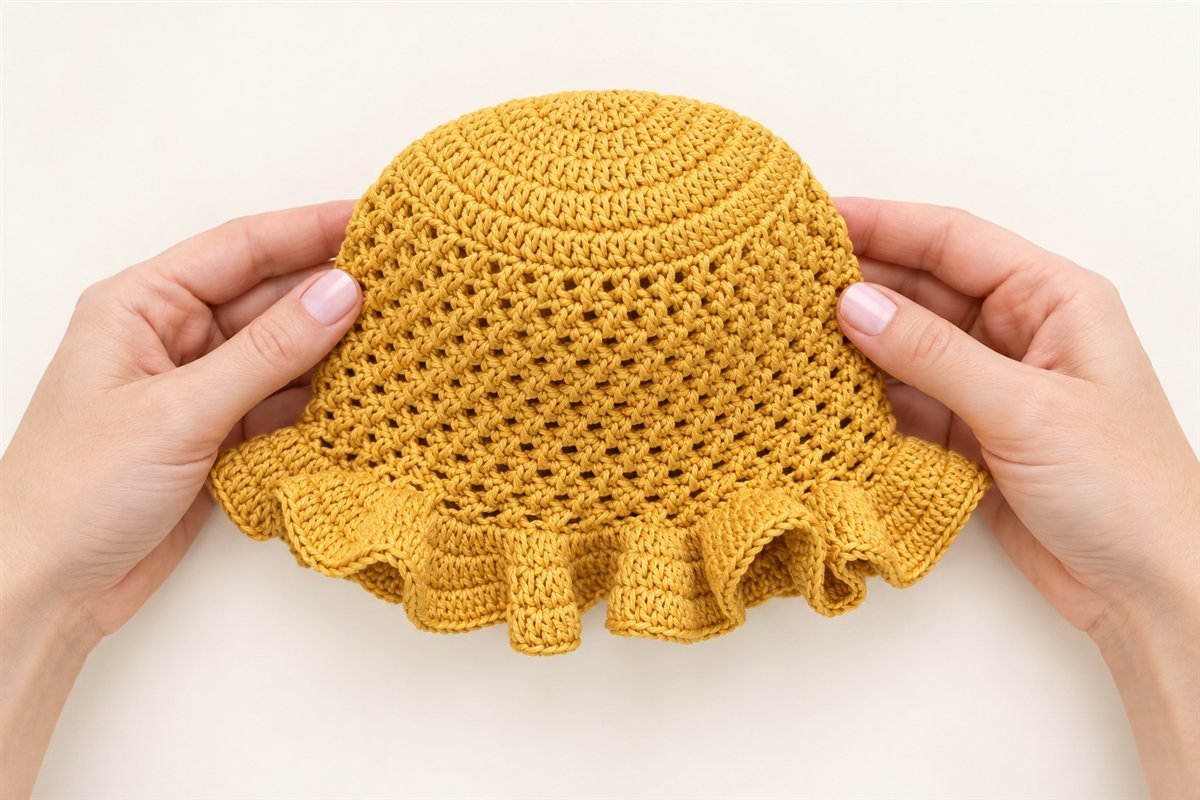
This beginner-friendly crochet baby sun hat combines a gently rounded crown, a textured crossed double crochet stitch, and three light ruffle rounds around the brim. The result is a soft bucket-style hat with a little extra shade and plenty of handmade charm. You will work in joined rounds from the center outward, so the project is easy to pause, measure, and adjust as your baby grows.
The sample is designed for approximately 3–6 months using a 3 mm hook and fine cotton yarn. Every baby’s head is different, and crochet tension changes from person to person, so use the measurements in this tutorial as a guide rather than a medical or safety guarantee. A hat for a baby should never be tied under the chin, left on during sleep, or used as a substitute for shade and supervision.
The stitch pattern is based on the supplied video tutorial by Marie. This article is an original educational explanation with additional beginner checkpoints, sizing advice, and troubleshooting. Follow the video link for the creator’s demonstration, and use this written guide as a companion while you crochet.
Before you begin
You should be comfortable making a slip stitch, chaining, and working a basic double crochet. The special stitch in the body is a crossed double crochet: two double crochets are arranged so they cross visually. It looks more complicated than it is. Once you understand where the skipped stitch is and where the first double crochet is placed, the rhythm becomes repetitive.
Work with the right side facing you as you join each round. Keep a stitch marker nearby if you find the first stitch difficult to identify. In this pattern, the beginning chain is treated differently in different sections: chains of two do not count as a stitch during the increase rounds, while the chain of three in the crossed-stitch section does count as the first double crochet. That small detail is important for keeping the stitch count accurate.
Materials
- One skein of fine cotton yarn, such as a fingering or light sport-weight yarn. The sample uses Drops Safran, shade 66, but any smooth yarn with a similar thickness can work.
- A 3 mm crochet hook, or the hook needed to match your tension.
- A blunt darning needle for weaving in ends.
- Small scissors.
- A stitch marker, optional but helpful.
- A tape measure for checking the crown and head opening.
Cotton is a practical choice for a summer hat because it is breathable and holds its shape well. Avoid fuzzy novelty yarn for this project: the texture can hide the crossed stitches and make it harder to see where to insert the hook. If you substitute yarn, make a small swatch first and check that the fabric is soft, flexible, and not too dense.
Abbreviations (US crochet terms)
- ch: chain
- dc: double crochet
- sl st: slip stitch
- st: stitch
- rep: repeat
- rnd: round
The pattern uses US terms. If you normally read UK patterns, a US double crochet is a UK treble crochet. The abbreviation is the same movement with a different name, so check your pattern language before you begin.
How the hat is built
The hat has three sections. First, you make a flat circular crown with seven increase rounds. Next, you crochet ten rounds of crossed double crochet without increasing; this creates the bucket-shaped side wall. Finally, you add three increase rounds to form the softly ruffled brim. The sample finishes at round 20, followed by fastening off and weaving in the ends.
The stitch counts are:
| Round | Main instruction | Total stitches |
|---|---|---|
| 1 | 12 dc into a magic ring | 12 |
| 2 | 2 dc in every stitch | 24 |
| 3 | 2 dc, 1 dc; repeat | 36 |
| 4 | 2 dc, 1 dc in next 2; repeat | 48 |
| 5 | 2 dc, 1 dc in next 3; repeat | 60 |
| 6 | 2 dc, 1 dc in next 4; repeat | 72 |
| 7 | 2 dc, 1 dc in next 5; repeat | 84 |
The ten body rounds use crossed double crochet and keep the same 84-stitch circumference. The brim then grows quickly because every stitch receives two double crochets in round 18, followed by two more controlled increase rounds.
Step 1: Make the magic ring
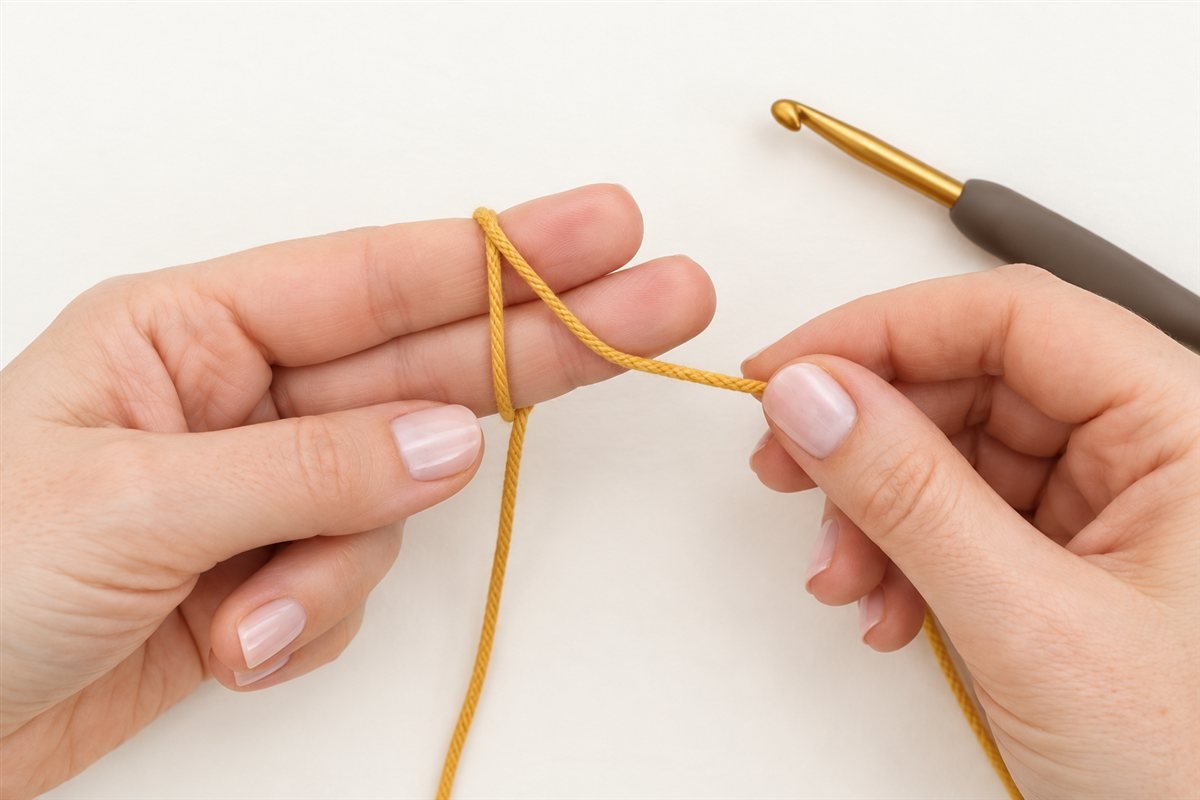
Wrap the yarn around two fingers to form a loop, crossing the working yarn over the tail. Insert the hook under the lower strand and catch the upper strand. Pull up a loop, then chain two. Hold the ring gently between your fingers so it does not twist.
Do not pull the center closed yet. You need the ring open while you work the first twelve double crochets. Keep the yarn tail long enough to close the center later—about 10–12 cm is comfortable.
Checkpoint: You should have a stable loop on the hook and an open circle below it. If the loop turns into a knot, loosen it and rebuild the ring before adding stitches.
Step 2: Work round 1—12 double crochets
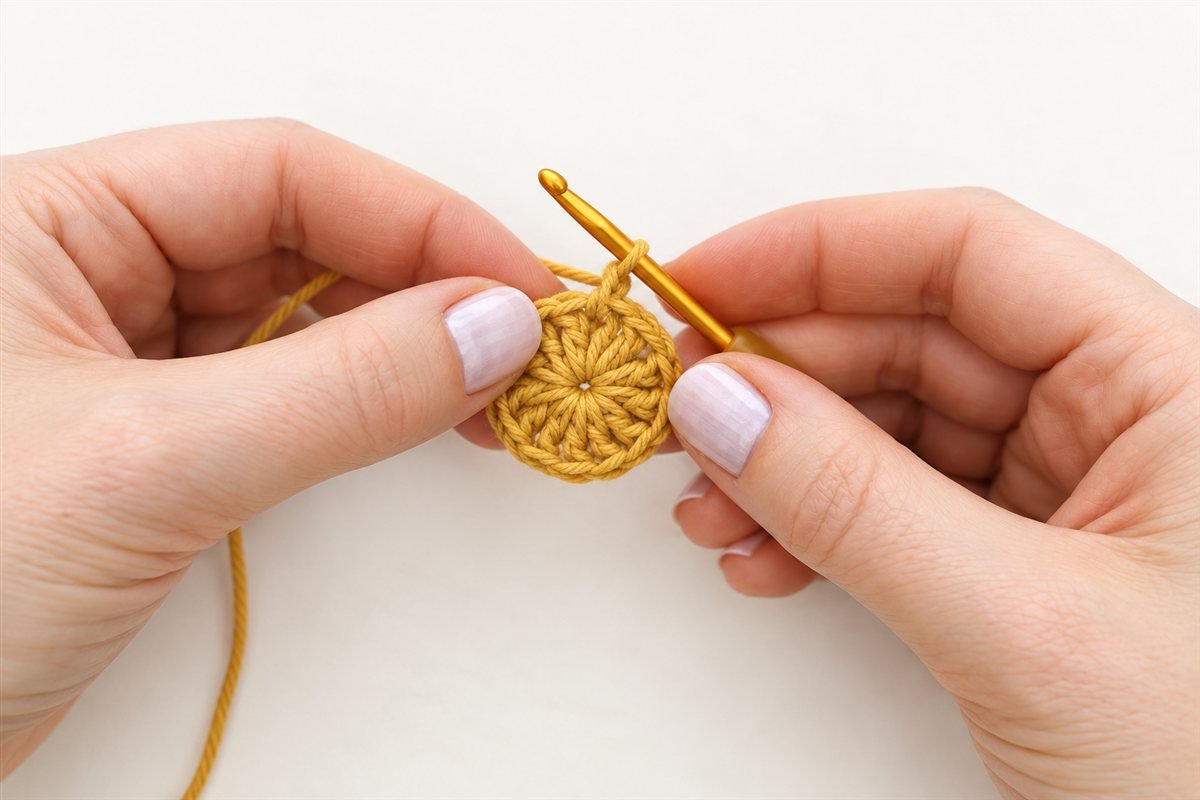
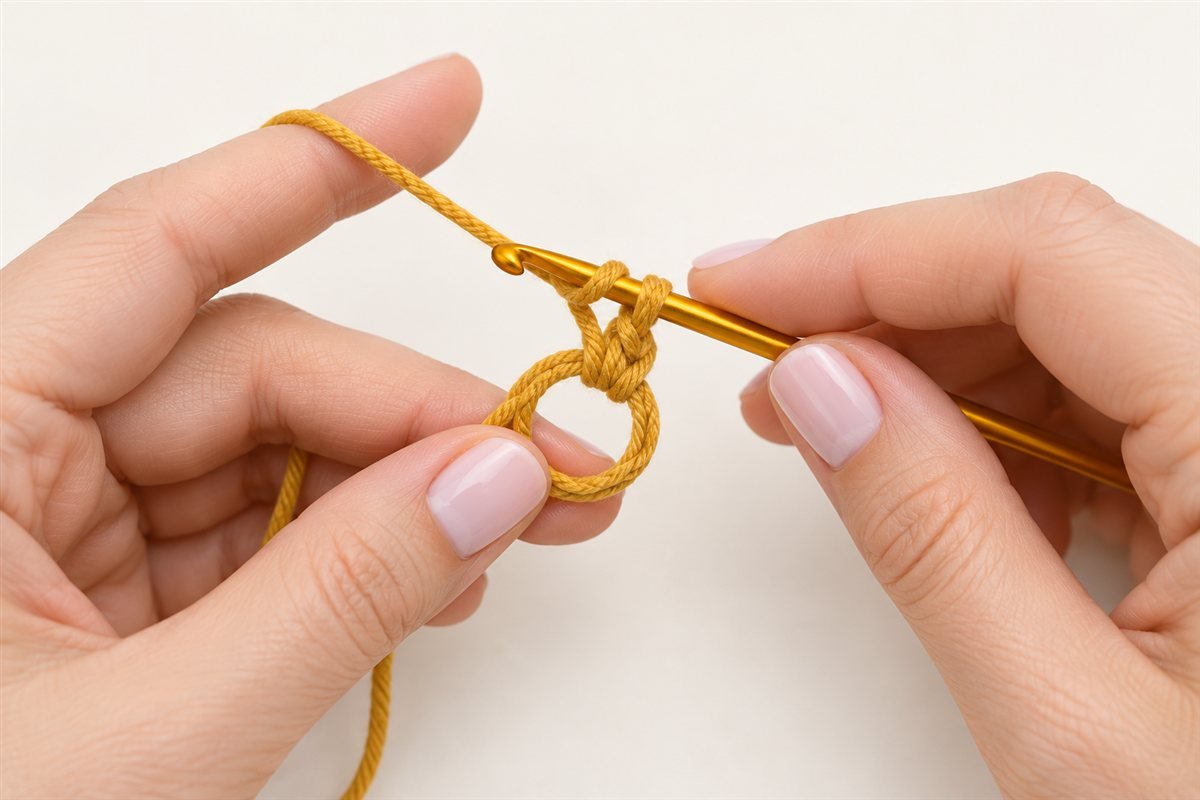
The starting chain two does not count as a stitch. Yarn over, insert the hook through the center of the magic ring, pull up a loop, yarn over and pull through two loops, then yarn over and pull through the final two loops. That is one double crochet.
Make eleven more double crochets into the same center opening. Spread the stitches around the ring as you work rather than stacking them in one small spot. When all twelve are complete, pull the yarn tail firmly to close the center. Join with a slip stitch to the first double crochet, not to the starting chain.
What you should see: a small, flat circle with twelve tall stitches radiating from the center. If the circle cups, your tension may be too tight; if it ruffles, your tension may be loose. A slight curve is normal at this stage.
Step 3: Build the crown with increase rounds
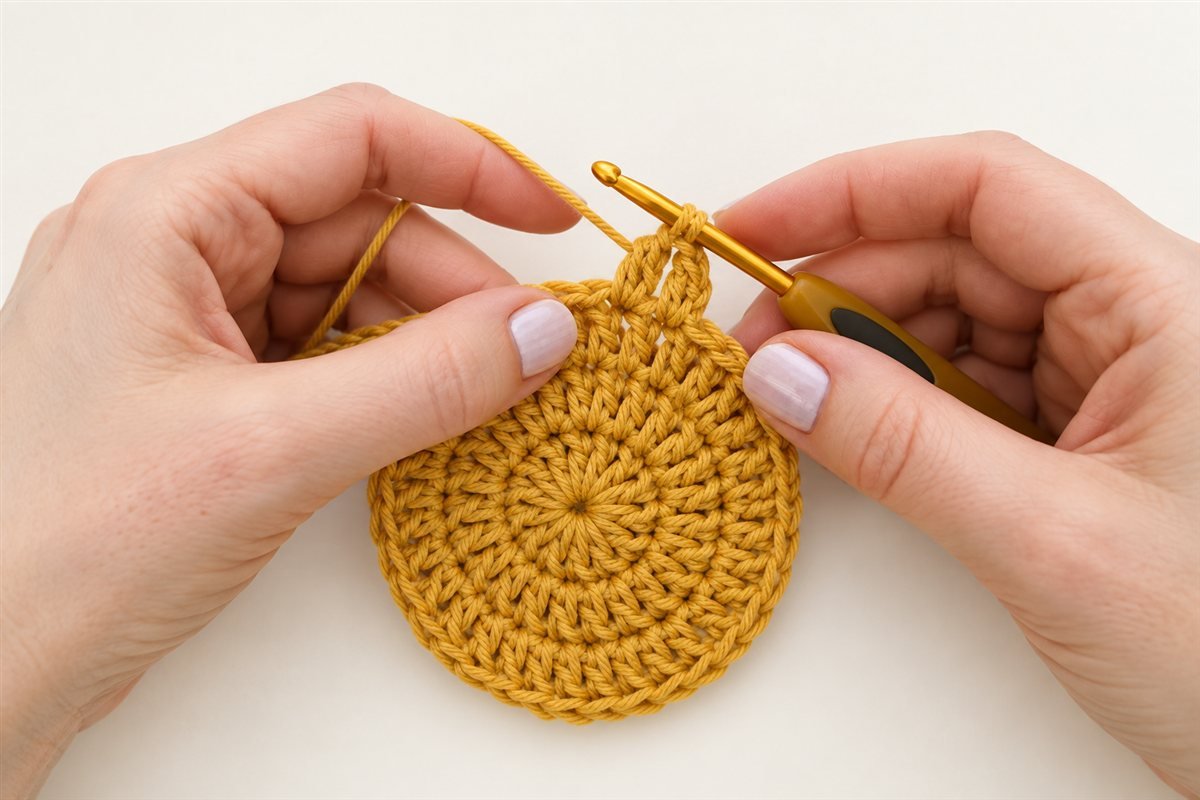
For rounds 2 through 7, chain two at the beginning. Remember that this chain does not count as a stitch. Work the first increase into the first real stitch, then follow the repeat around the circle. Finish each round with a slip stitch into the first double crochet.
Round 2: 24 stitches
Work two double crochets in every stitch around. You will make twelve increases, giving you 24 stitches. Keep the increases evenly distributed; each pair should look like two posts growing from the same V-shaped stitch.
Round 3: 36 stitches
Repeat: two double crochets in the next stitch, then one double crochet in the following stitch. Continue this two-stitch rhythm around. The round ends with 36 stitches.
Round 4: 48 stitches
Repeat: two double crochets in the next stitch, then one double crochet in each of the next two stitches. At the end, count 48 stitches before joining.
Round 5: 60 stitches
Repeat: two double crochets in the next stitch, then one double crochet in each of the next three stitches. Your circle should now be large enough to cover the top of a small baby’s head.
Round 6: 72 stitches
Repeat: two double crochets in the next stitch, then one double crochet in each of the next four stitches. Keep the fabric flat. If it begins to form a bowl too early, try relaxing your hands before changing hook size.
Round 7: 84 stitches
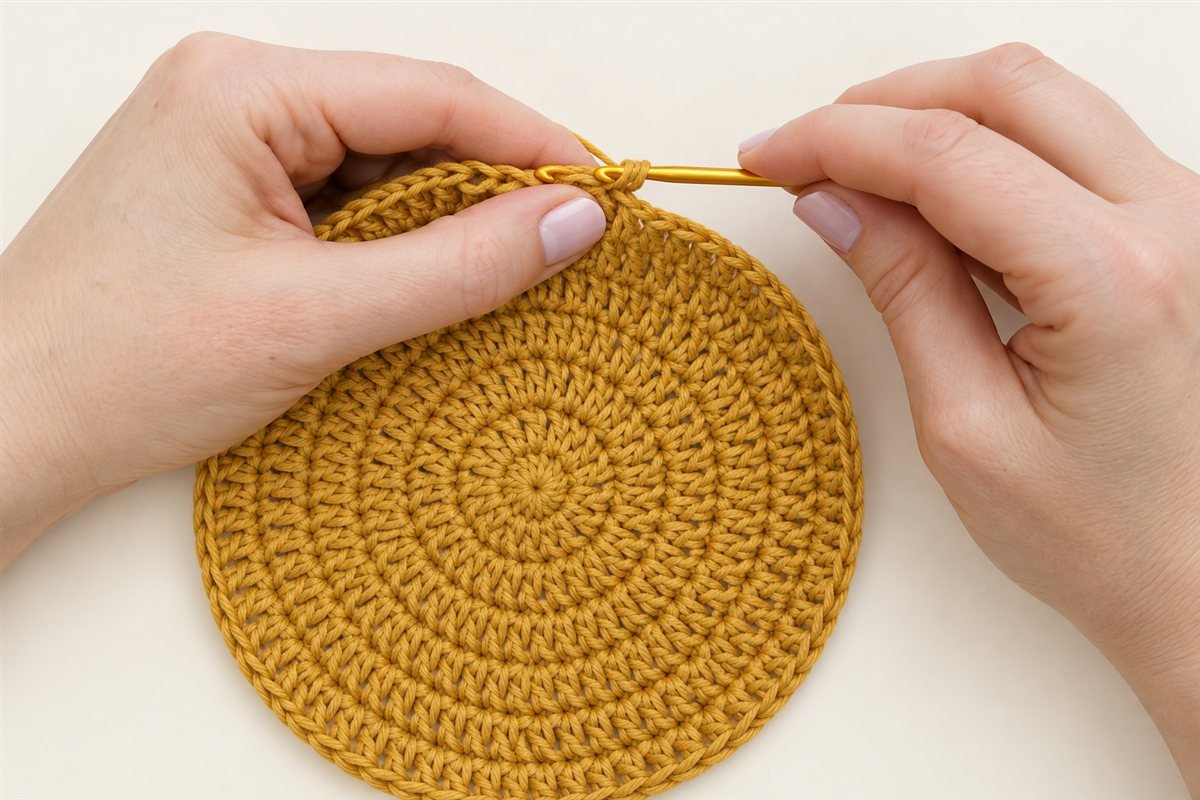
Repeat: two double crochets in the next stitch, then one double crochet in each of the next five stitches. Join with a slip stitch. This completes the increasing crown in the sample size.
Sizing note: The crown should lie flat and measure close to the intended head circumference when gently stretched. For a larger size, add another increase round using the same logic: two double crochets in the increase point, followed by one double crochet in six stitches. Add matching body rounds to increase depth. Measure often instead of relying only on age labels.
Step 4: Learn the crossed double crochet
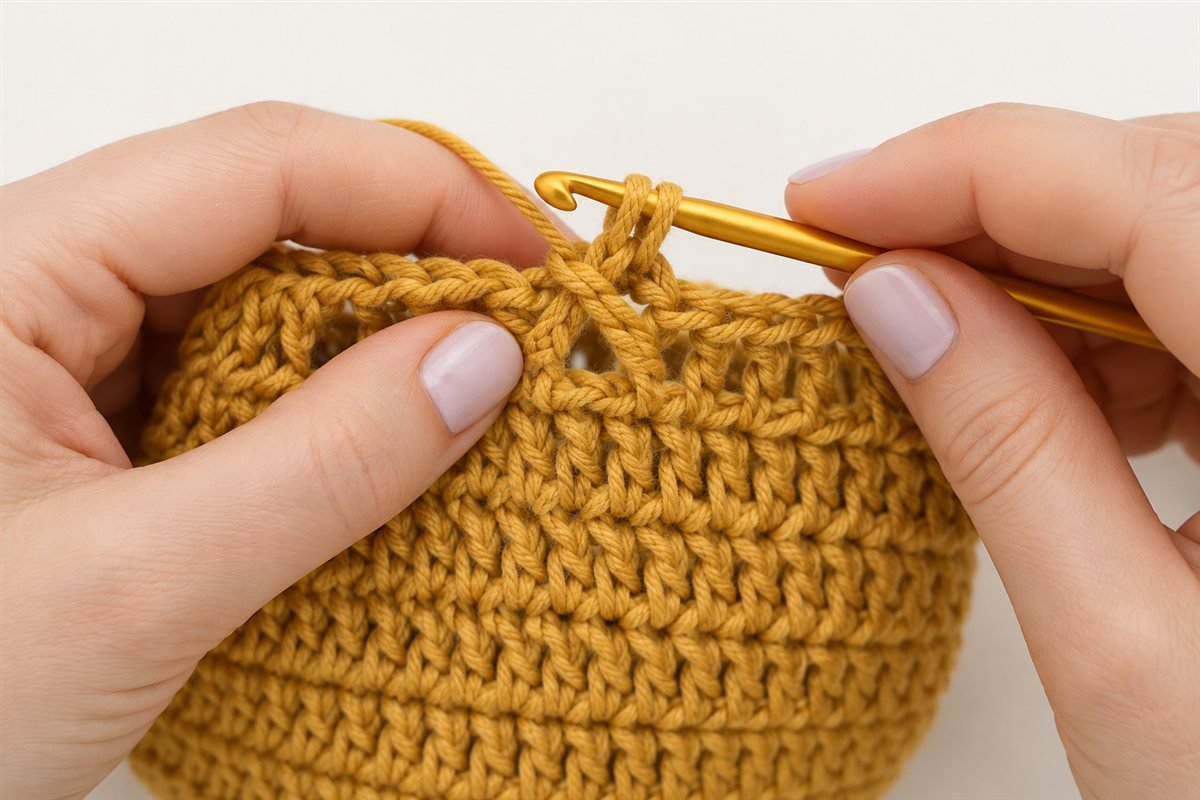
The crossed double crochet is worked over two stitches. Skip one stitch, make a double crochet in the next stitch, then return to the skipped stitch and make another double crochet there. You can insert into the skipped stitch from the front or from the back; choose one method and use it consistently. The sample video demonstrates the back insertion, which keeps the crossing neat.
The easiest way to remember the movement is: skip, stitch forward, cross back. The two posts will lean toward each other and form a small X. Do not pull the second stitch too tightly, or the crossing will disappear into the fabric.
Step 5: Crochet ten rounds of the hat body
Begin round 8 with chain three. This chain counts as the first double crochet. Skip the next stitch and make one double crochet in the following stitch. Then make a double crochet in the skipped stitch, crossing back to complete the first pair. Continue the same crossed-double-crochet rhythm around.
At the end, slip stitch into the top of the chain three. For rounds 9 through 17, repeat the same crossed stitch pattern. The sample has ten total rounds of crossed double crochet, from round 8 through round 17.
After every round, pause and look at the fabric from the outside. The stitches should form repeated diagonal crossings with small open spaces between them. If you accidentally work into the wrong stitch, the crossing may look like a straight pair or a hole. Undo only back to the mistake, correct the pair, and continue.
Fit check: Place the work against the baby’s head measurement or a soft hat form. The side wall should cover the sides of the head without stretching tightly. A baby hat must never be tight around the forehead or ears.
Step 6: Create the ruffled brim
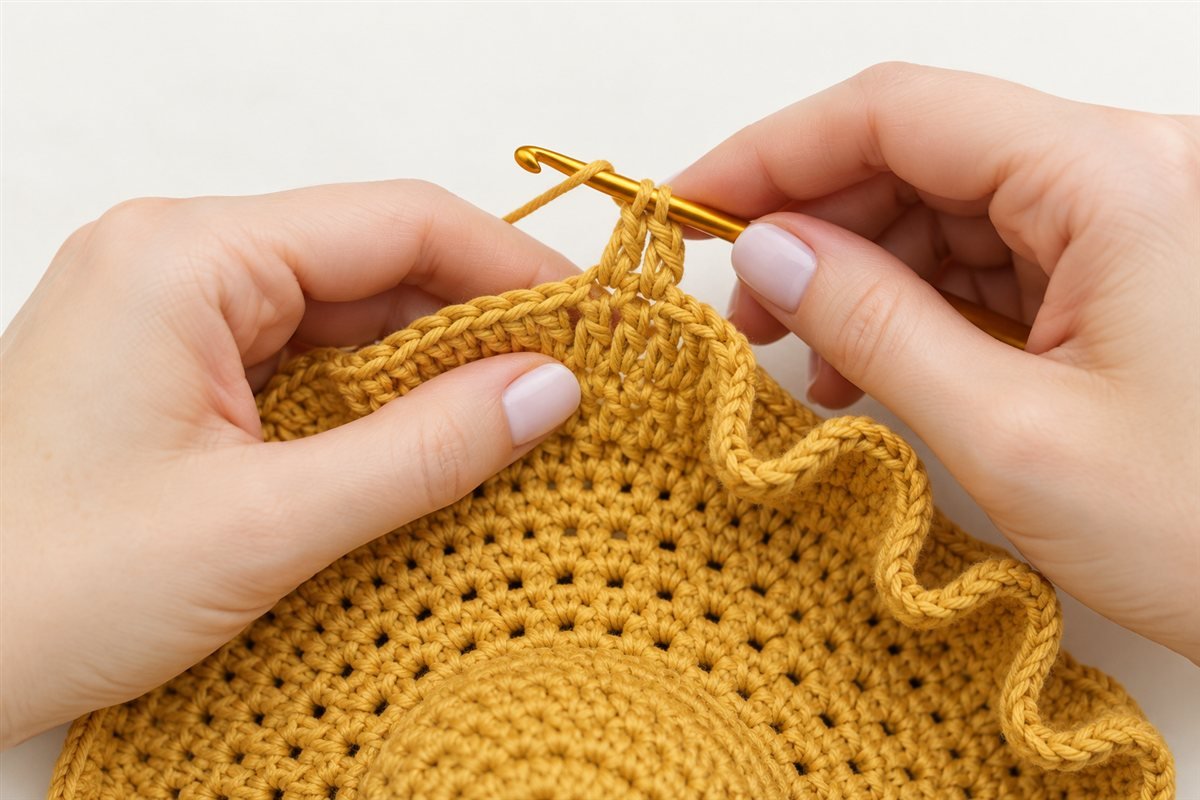
Round 18 creates the main ruffle. Chain three; this chain counts as the first double crochet. Make one more double crochet in the same stitch, then make two double crochets in every stitch around. Join with a slip stitch into the top of the chain three. Because every stitch receives two double crochets, the edge expands dramatically and begins to wave.
For round 19, chain two; this chain does not count. Work two double crochets in the first stitch, then one double crochet in the next stitch. Repeat around and join to the first double crochet.
For round 20, chain two again. Work two double crochets in the first stitch, then one double crochet in each of the next two stitches. Repeat around and slip stitch to close. This final increase is more gradual and helps the ruffle sit around the face instead of flaring straight outward.
If your brim is too wavy, check that you did not accidentally add extra stitches between the planned increases. If it is too flat, loosen your tension slightly or add a small amount of ease in the final round.
Step 7: Fasten off and weave in the ends
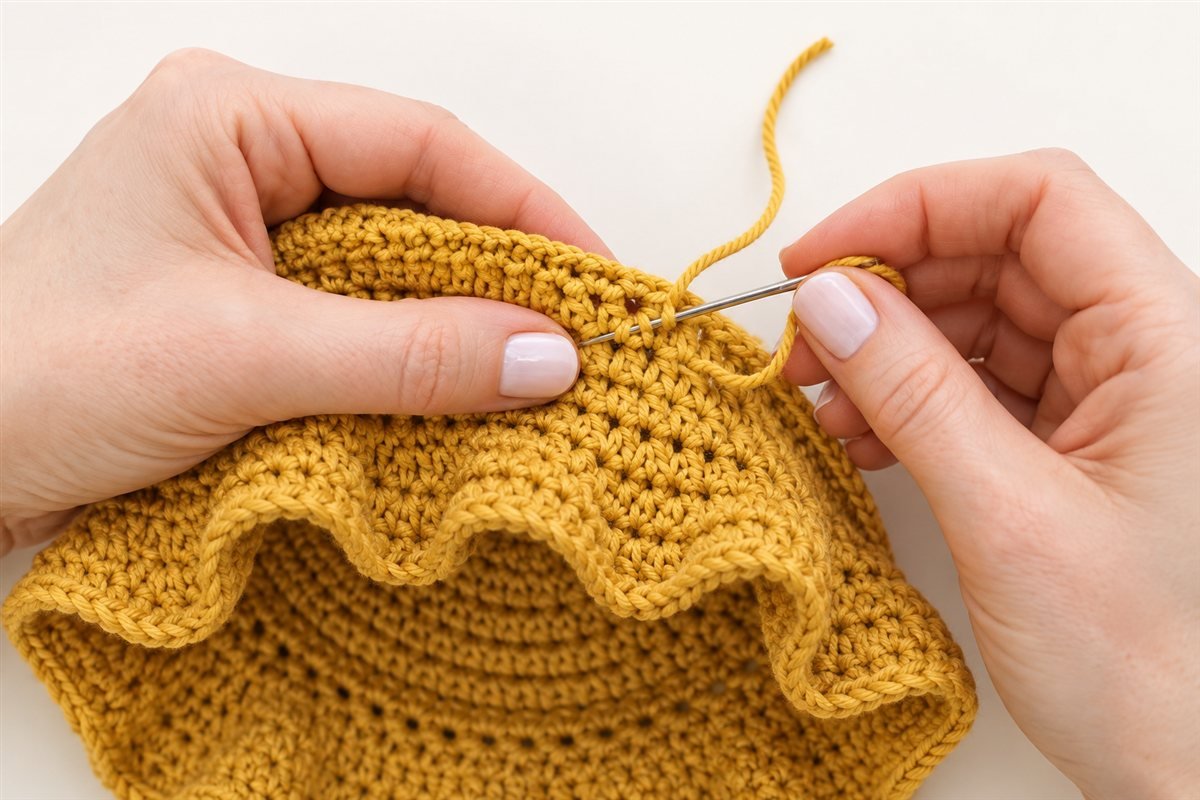
After the final slip stitch, cut the yarn leaving a tail of about 12 cm. Pull the tail through the loop on your hook and tighten it gently. Thread the tail onto a blunt needle and weave it through several stitches on the wrong side of the brim. Change direction once or twice so the end cannot pull free. Trim the excess close to the fabric.
Weave in the magic-ring tail in the same way, working through the dense center stitches. Do not leave loose ends inside the hat where tiny fingers could pull them. Before wearing, turn the hat inside out and check that no sharp needle ends or long strands remain.
Technique Lab: small details that make the hat look better
You can finish this hat by following the steps above. This section is for the little observations that make the fabric look more even, make the brim sit beautifully, and help you diagnose a problem before it grows. Treat these as practice notes, not extra requirements.
Read the top of a stitch before inserting the hook
At the top of each double crochet is a small V made from two loops. For the ordinary double-crochet rounds, place the hook under both loops of that V unless the instructions tell you otherwise. This keeps the crown compact and gives the joining edge a tidy, predictable line. If your hook catches only one loop by accident, you may create a loose ridge or a small hole. Pause after a few stitches: the V shapes should stay visible along the top edge rather than becoming stretched or twisted.
Keep the crown flat by checking it early
The important sign is not just the stitch count—it is the behaviour of the circle on a flat surface. After rounds 3, 5, and 7, lay the crown down without pulling it. A flat circle means the increase spacing and your tension are working together. A bowl shape usually means the fabric needs more ease, while ripples usually mean it has gained too much ease. First recount the round; only then change your hand tension or hook size. This order prevents you from “fixing” a counting mistake with a different hook.
Give the crossed stitch enough room to cross
The second double crochet in each crossed pair travels back into the skipped stitch, so it naturally wants a little more yarn than a regular double crochet. Let the loop on the hook rise to about the height of the hook shaft before completing that stitch. If you pull it tight, the X will collapse and the body can become narrower than the crown. A clean pair has two visible diagonal posts and a small, consistent opening between pairs.
Make the round join disappear into the texture
Before joining, gently pull the working yarn just enough to make the last stitch the same height as its neighbours. Then insert the hook into the stated first stitch or the top of the beginning chain—not into the space beside it. This avoids a raised bump at the join. The seam will still exist because the hat is made in joined rounds, but it should read as one quiet vertical line rather than a step in the fabric.
Shape the ruffle with tension, not extra stitches
The brim gets its movement from planned increases. If one section curls inward, loosen only the working loop and your grip for the next few stitches; do not add an unplanned increase. If it flares more in one area, compare the height of your double crochets there with the rest of the round. Gentle, even stitch height creates a soft ruffle, while extra stitches create a lopsided edge. After round 20, place the hat on a smooth surface and use your fingertips to spread the brim evenly before deciding whether it needs adjustment.
Troubleshooting guide
My crown cups like a bowl. Your stitches may be tight, or you may have skipped an increase. Check the stitch count and try a slightly larger hook for the next sample.
My crown has ruffles before round 7. Too many stitches were added. Count at the end of each round and verify that each increase is separated by the correct number of single double crochets.
I cannot see the crossed pattern. Make sure you skip one stitch, work into the next, and then return to the skipped stitch. Keep the second stitch relaxed.
The brim is uneven. Mark the first stitch and count the final round. Uneven tension can also make one section flare more than another; gently steam-block only if your yarn label allows it.
The hat is too small. Add one or two increase rounds to the crown before beginning the crossed pattern. You can also use a larger hook, but check that the fabric still has enough structure.
Frequently asked questions
Can I make this hat for an older child?
Yes. Measure the intended head, crochet enough increase rounds for the crown to cover that measurement, then add body rounds for depth. The stitch pattern is flexible, but always test the fit before finishing the brim.
Can I use acrylic yarn?
You can, provided it is soft and washable. Acrylic may feel warmer than cotton, so it is better for mild weather than very hot sun. Choose a smooth strand so the crossed stitches remain visible.
Does the chain at the beginning count as a stitch?
The chain two at the beginning of the increase and brim rounds does not count. The chain three in the crossed-double-crochet section and round 18 does count as the first double crochet. This is why the joining point changes slightly between sections.
Is the ruffle safe for a baby?
The ruffle is decorative, but safety depends on fit and supervision. Never add ties, beads, buttons, or loose decorations. Remove the hat during sleep and whenever the baby is unattended.
How do I wash the finished hat?
Follow the yarn label. For cotton, gentle hand washing in cool water and reshaping flat usually protects the stitches. Avoid twisting the brim; press water out in a towel and air-dry away from direct heat.
Final thoughts
This baby sun hat is a satisfying project because every section teaches a useful crochet skill: working into a magic ring, spacing increases, joining rounds, crossing double crochets, and shaping a ruffled edge. Save this tutorial before you start, and return to the stitch-count table whenever the round begins to feel confusing. Once your first hat fits well, try a different color, a smoother brim, or a larger size using the same construction plan.
Video reference: How to Crochet a Baby Sun Hat | Baby Bucket Hat | Step by Step
More in Crochet Projects & Patterns
How to Crochet a Gift Card Holder: An Easy Handmade Gift for Beginners
How to Crochet a Reusable Gift Bow: Easy Christmas Package Topper
How to Crochet a Flower Bookmark: An Easy Handmade Gift for Beginners